Painting Mice and Mystics Lily

My apologies for missing yesterday’s WIP post. It was in part due to the exciting news that Lily is no longer a Work In Progress but a finished piece and the next in our Painting Mice&Mystics series.

image

Lily is my personal favorite of the tiny heros you can play as. She doesn’t appear in the game right away but shows up in later scenarios to save the day.

image
The bases will be left unpainted from now on because I’ve decided to rebase all the pieces after they’ve been finished.
image
Sorry about the shadow of the phone. I’m saving up for a nice light box but until then the awkwardly lighted pictures will continue :p
image
The cape is done with a glazing technique. That means I watered down the original color and slowly added more layers. For the final layers I added a little white and yellow and a dark green wash in the folds.

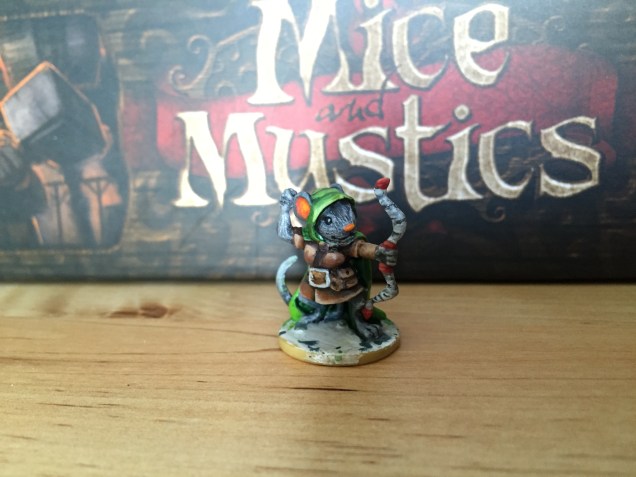
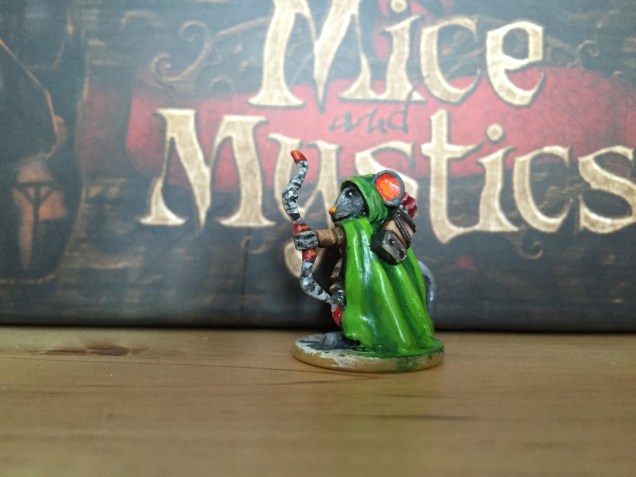
Im very happy with the progress that I’ve made with blending, glazing, and building leatherwork. If I look back at older pieces, I can see the two brush technique really improving with each piece. The Two Brush Technique is where you take two similar shades of colors, paint them side by side and use a 2nd brush to blend the middle together.

image
The bow and arrows are birch tipped with red leather straps and feathers.
image
The white wood makes the red feathers really pop! It also helps break up the red and green and help keep the piece from the dreaded Christmas look (something you risk anytime you put red and green together)

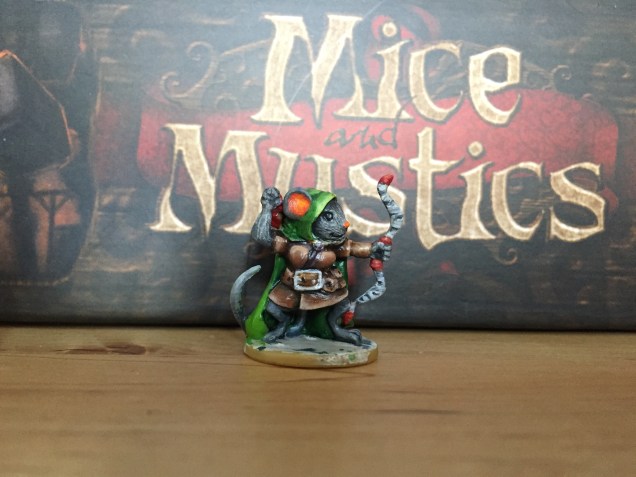
I also was given the great idea of painting Lily’s bow in Birch by a friend. Never painting that kind of wood before I did some research and I came across a great article by Dagger & Brush. If you haven’t checked out this blog yet, but you love war gaming, you should definitely head over there. I’ll include a link at the bottom to the Birch tutorial. It’s easy to understand and has some great example pictures of the technique. Although his came out a very realistic Birch while mine is probably a step above camo, I’m still really happy with it as a first try. I hope to try more weapons and armor in unusual materials more often.

Here’s a link to the Dagger and Brush guide to painting Birch

WIP Wednesday

It’s been a crazy week with the launching of a new Game Night and Food blog I’m participating in. You can check it out at dungeonsdinners.wordpress.com It focuses on throwing great parties based around tabletop games and some very talented cooks are donating their skills to the project. Since I spent most of my days off working on recipes and editing, I only have two pieces of news for this Wed.

First off I’ve made some progress on the next figure for the Mice&Mystics series.

image

imageimage

Please forgive how dark the pictures are. It’s a miserable dark rainy day and I really only have one window in my apartment to start with. Lily should be done by next week. Finally I will be almost done with the heroes and ready to move on to villains.

The next piece of news is a really cool community project being done by Massive Voodoo. They are asking all painters to please send as many painted zombies as possible for a massive Diorama they are working on. Its set break the record of most zombie minis on a miniature work ever done. Plus the whole painting community from around the world will be adding their personalities to it. Check out    massivevoodoo.blogspot.com for more details and instructions on how to participate

image

Here are my submissions. They are a few pieces stolen from the game Zombies!!!

Thats about it for this week! Look out for the upcoming post Painting Lily from Mice&Mystics

Here’s the link to the zombie community project!

Painting Descent 2nd Edition Goblin Archers

Hello and happy Winter Wonderland weekend. I hope everyone on the east coast is thawed from the big blizzard that hit last week and has planned some fun activities now that it’s beautiful outside. For those of you who are working today, I’ll be joining you to ensure every game night tonight has some fantastic pizza. I spent the blizzard playing games with my friends instead of painting but I’m ok with that. Sometimes it’s good to remember that’s there’s a really fun game underneath all those figures. So let’s look at how one of those games are progressing.

image
Here is the full Goblin Archer Army in all their tiny glory.

On these pieces I tried to focus on really nailing down my blending and getting bolder and brighter highlights. I’m feeling more skilled with the wet pallet now and I find myself mixing paint with a little more confidence. That isn’t to say these pieces are perfect. I’m still missing mold lines when cleaning and I rely on washes too heavily. Which makes getting bright colors that pop difficult.

image
I decided to go with a cartoony lime green for the normal Goblins. But instead of slowly adding white paint to the mix for the highlights I added more yellow. I need to find myself some Ninja Turtle Minis because I want to try this skin tone again. Plus how awesome would those minis be!
image
All the archers are in different stages of Michael Jackson like leans. Normally to fix this you can take a blow dryer or heat up some boiling water or uncooked rice. Then dip the mini in for a few seconds and move it to the desired position and hold until cooled. However these guys looked so ridiculous and seemed to have added personality with their positions that I decided not to fix them.

When painting I always use a color Wheel to help me plan how I want the mini to look beforehand. For these minis I chose to use Triad colors. Which for Green is Purple and for Red is Blue. You don’t have to live and die by the rules of your color wheel and you can experiment with tons of tones within a spectrum of color. But understanding color is essential to any visual art and when I started studying it there was a sudden jump in my miniature’s quality. To achieve the highlights on the clothing I simply added more and more white to my purple color mix.

image
This guy took multiple tries to finish. I knew what I wanted to do with the skin tone but had trouble visualizing it after painting so many green goblins. I also had originally painted his armor brown like his brothers but quickly realized that it just faded into the orange. I went back and repainted him with grey armor, which looks much better against his skin. The point I’m trying to make is don’t give up even if you can’t fully visualize the end. Whether through practice or accident you’ll get there.
image
The quiver of arrows was very difficult to get right. Any highlighting trick I used didn’t seem to bring out individual arrows. Then I took a very dark almost black blue and drew some lines in the creases. Suddenly it looked like a bunch of arrows and I just took some very light blue and picked out a couple of the tiny lines. I’m glad I stumbled upon this trick because every mini in games seems to have arrows and I always dread doing them.

After finishing the Boss Monster it was just down to the small details. I used some different shades of brown stripes to create straps and did a white highlight over dirty bone to make all the boots look furry at the top. Then everything was sprayed with crystal acrylic finish and after curing for a day a final Matt finishing spray to tone down the plastic shine look. Doing these sprays will alter your color a little (usually by darkening your colors a bit) but it’s worth it to get the protection needed when fingers will be rubbing the pieces for hours when playing. You can compensate  by making the colors a shade brighter than you want them.